Tuesday, September 24, 2013

CAFE CM400 BUILD - New Tank

 Ok, back to this sheit. After the last fuel tank debacle, I stumbled on a Suzuki GT250 tank at a salvage yard. I liked the way it looked and the cost was about $10. The tank inherently offers up two separate projects in that I will be making new emblems as well as a filler cap. The fuel cap will be a billet aluminum quick release type. As for the emblems...just don't know yet, but probably cast aluminum or bronze. The smallish squared tank looks good in the frame and just needed to be picked up in the rear. The bottom line of the tank follows the line of the tailpiece About an hour to cut fit and fab the existing tang to fit to the frame. I found a grommet that fit the tang and fabbed an oval piece of steel to fit in the strange new hole. All in all a good fit. I was lucky that the front mounts fit relatively well, just needing two plastic inserts to put the tank rubbers outboard a bit. This project is running more than a year now and time to work on it is scarce. It will however be done one day. Can't wait just for it to be gone. I ride most days I can and I adore riding, but building is an entirely different pursuit. I find when there is no demanding deadline...its so much more enjoyable.
     

Now that the tank mounts are set and the seat pan, I will be doing battery box mounts and all other frame welds so I can get to the paint stage for the frame. Till next time, cheers.


Monday, October 22, 2012

If You Like Small Honest Bike Shops...

Help my friend Kendrick by casting a vote for him to win a [small business] grant. It doesnt matter if you're in Alaske or Florida or Sweden, or Germany or anywhere!  Its easy and quick and FREE. The grant would help his biz as well as his customers enabling him stock a deeper selection of parts as well as many other sweet things little independent bike shops need.  Quaker City Motor Works is a small bike shop here in Glenside Pa, specializing in Brit bike repairs and customs, and Kendrick is a good bloke! Have a minute?...cast a vote for him. Below you will find a link-click it and cast a vote.
 Thanks, 
 Philip Peck
 http://grantcontest.fedex.com/fedex-small-business-grant-voting/microsite/gallery/5069e4b470bbb1fc76000018

Sunday, October 14, 2012

Cafe CM400 Build - Tank Test


The tank started to look pretty good after grinding. This tank was going to have body filler added, but needed to be tested for leaks before Bondo. I thought I would just add some air pressure with an air gun. The tank folded and buckled at a surprisingly low pressure. I was shocked. I did indeed find the leaks as well as turn many hours of work into scrap metal. The next step is deciding on the new tank.

Tuesday, August 7, 2012

BMW CAFE RACER R75/7

This is the BMW R75/7 Cafe racer build. Its been in progress for some time. I wanted to do the frame stiffening and the stiffened swing arm. The tank will be aluminum as well as the tail piece. I will be showing more on this build in a while.


side bracing turned out well-the sockets have internal tapers that seat on tapered bosses welded to the frame.
Final drive in place to add rigidity while I welded.

Tacked and ready for beads

DOM tubing, torch bent over a mandrel
Tank coming together, its quite large.

Wednesday, August 1, 2012

OUT OF THE SHOP

Philip is on a buisness trip, he's in a far away land, northern Jersey to be exact. He is peddling his wares as they say, "gone to market" might say others. So why is Philip writing in third person? Drama, simple as that. He is not in his shop where he can access photos and work on bikes and make postings of real metal bits being added to motorbikes, and he resents it. My friends, this will be an intellectual posting, when we set down our wrenches, we click off the Miller Synchrowave, and we reflect. Its time for some prose.
   The jacket is on already, the gloves are stuffed impossibly into a side pocket. The helmet is in the left hand and the keys are in the right. All time stops as the key is slid into the ignition switch. The kill switch is then flicked on and the starter button pushed. The engine fires, time starts again. As the bike warms up, we gear up. The air rich with hydrocarbons  as the machine is rolled out, and mounted. We are chambered and cocked, kick down, eyes up, and now clutch release. It begins...this dance we do, this song we sing, our bodies riding an impossible projectile traveling in our minds eye. Not only head but heart as well for our reference point. This exercise we move through has a cleansing effect, scrubbing away all but the essentials of the moment, such as braking and entry, apex and track out. Our attention riveted to road and target, the two hundred yard focus and glimpses of red line. Are we not space men? Are we not Cyclonauts drawn desperately to our type of space, the one in our minds, where we fly using our organic instrumentation  and the most spectacular invention...our beloved  motorbikes. Ride we say, fly... escape this world.

BMW CHOKES - The Blue Rat Drops A Valve


My '74 BMW R60/6  ...AKA The Blue Rat...dropped a valve due to badly worn valve guides. Learning curve...if you get a flat spot after 3000 RPM's it may not be the carbies. Here are some nice shots of the damage.


Very nice cratering of the piston crown!


Beautifully embedded valve tulip. Well done!


One cycle lift is not enough.


Bragging rights...got her down low enough to grind her heads! She's an old girl...but she puts out.
(yes I was scared)

Wednesday, April 4, 2012

HONDA CM400 CAFE BUILD-Steel Tailpiece

 The tail piece  is fabricated out of steel sheet. First card stock patterns were cut to lay it out on the sheet steel. I then made a run to my bud Jim at Marquise Auto Restorations to use the shear and box and pan break. The seat pan was done in one piece and the round tail, in two. One hour and the two tail sections were shaped on the english wheel, trimmed and ready to be tacked together. The seat pan was pretty much done on the break, I just needed to tack and weld the cuts. A hump had to be put in the front of the pan for some clearance for the frame, visible just behind the tank. Next the round tail and the seat pan were tacked in place and final welding was done. As a finishing touch, I ran the lower edge through a Pexto bead roller to stiffen the assembly and define the bottom of the tailpiece.


I wanted to slam the pan as low as I could against the frame, following the contour of the frame. So far Im ok with how it looks. Its coming together as a "look" with the modified tank. Right now I have an 18 inch rear wheel temporarily on there to make it a roller, and my brother says I gotta keep it. The CM400 had a 16 inch rear wheel which does look stupid in this case. so I will probably stick with the 18 inch rear. Tail lights are always in issue/decision with a cafe bike. Im really not sure what I'm going to do with this one. Possibly a little 2" red dot in a sheet metal cone contoured into the hump. but the hump has a beauty left naked. That's for a later day.

Wednesday, November 2, 2011

HONDA CM400 CAFE BUILD - Fuel Tank Modification


Sorry folks, I grabbed the whizzer before I grabbed the camera, so I don't have a before picture of the tank, but there were two styles on the CM400 and this was the type with the ridge on the top and not the tear drop cruiser tank. I believe these tanks were on the CM400T. I also believe the T stands for turd, but I'm not 100% certain. The plan was knee cutouts and a lower deck top with a weld in filler cap. First I stripped the paint with a super aggressive twisted wire brush on an angle grinder. I would say in the end it was as quick as using Tail Strip. Next, I whizzed the top off and made two circular cuts, and started to warp the surfaces into shape. and did some dent work. I then tacked in some scalloped shaped parts that I cut out and hammered up.


   Sorry I seem to work faster than I can photograph.  I cut a deck lid and gave it some shape on the english wheel. Cut the hole for the fuel cap and welded that in. Then zipped it shut. I just need to pressure test it now. Think I got pinholes? I"ll let you know how many later.


  Here is the tank on the frame ready for grinding, mud and sanding. Once the tank is in primer the shape will read much better.

Thursday, October 20, 2011

HONDA CM400 CAFE BUILD - HOMEMADE CLIPONS

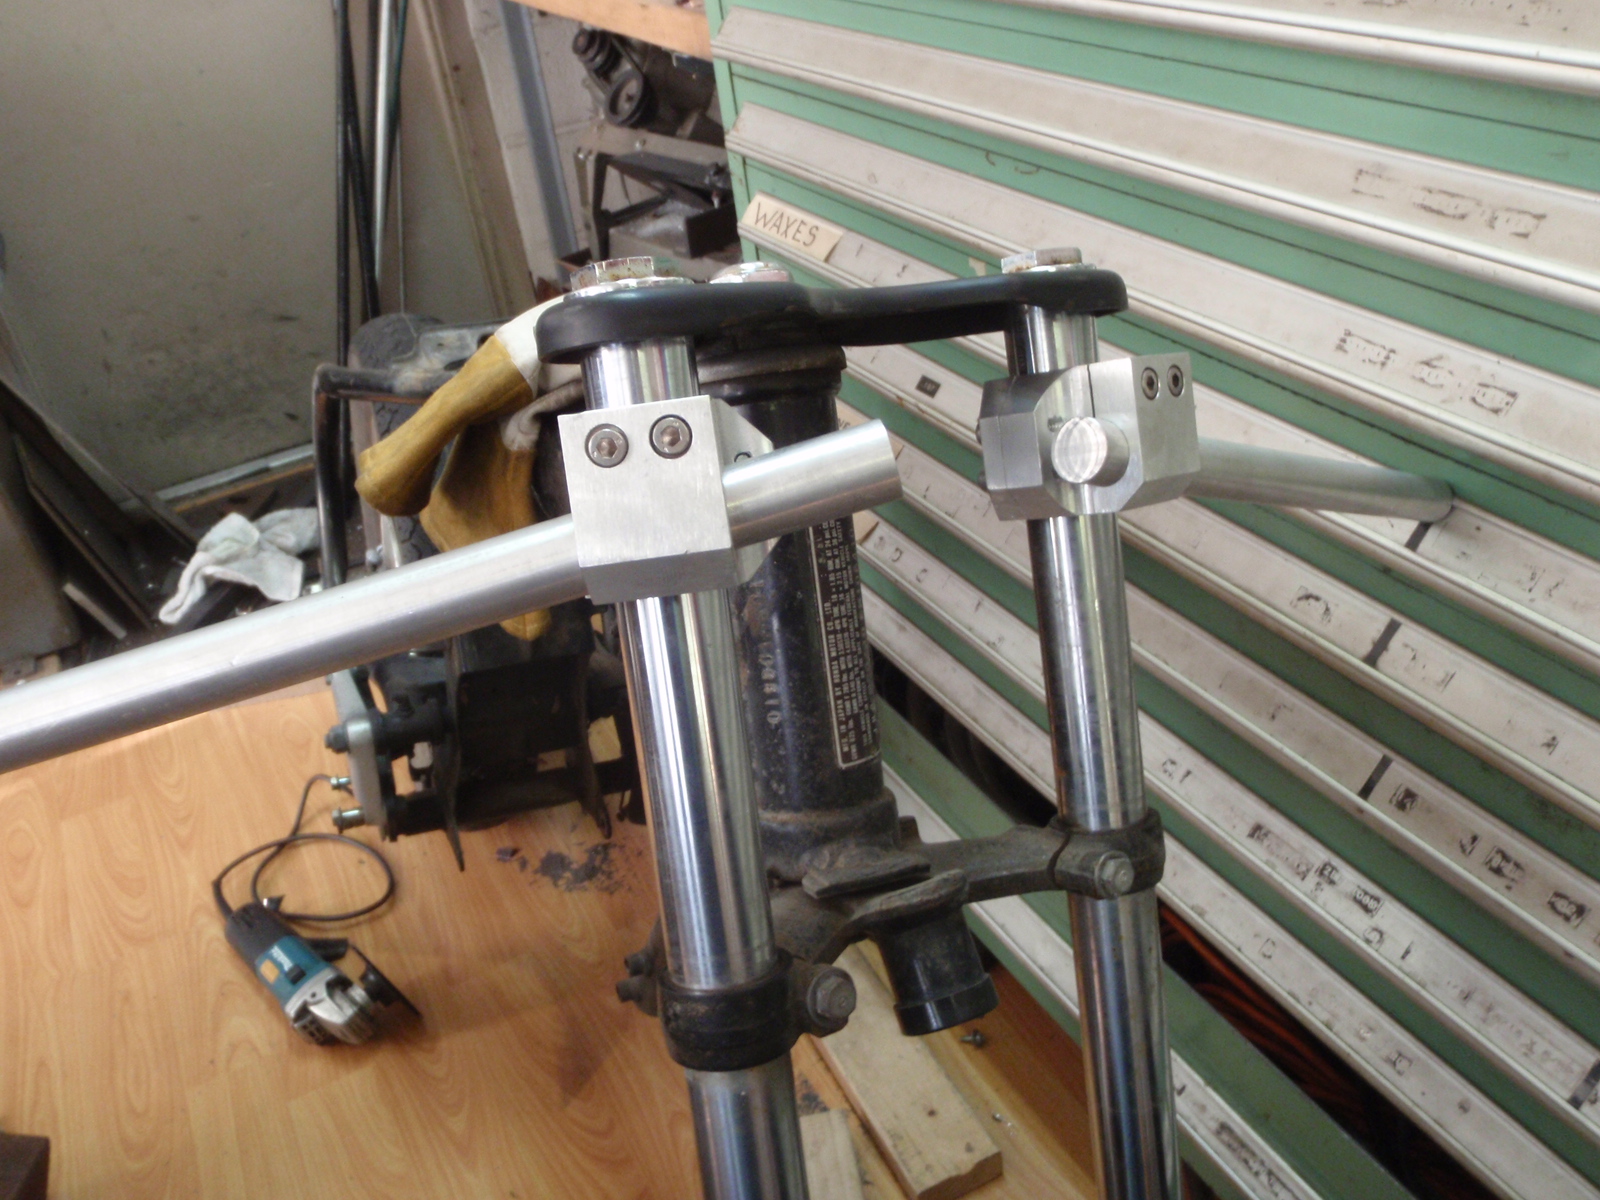
These are the clipons I machined for the project. They are pretty much just billet aluminum with holes punched in the right places and as much excess aluminum removed. Not sexy, but shop made. The aluminum is 7075. The real fun is making parts, not ordering them. Cutting metal and thinking through the process is a healthy endeavor, and much of what this blog is about.

HONDA CM400 CAFE BUILD - Frame Modifications

The bike was totally stripped and the frame modifications were the first order of business. First I cut the rear part of the frame off. These are often built up pressed metal components on UJMs. I wanted a cleaner more visible tube frame in the rear. This also gave me the opportunity to relocate the rear shock mounts to adjust the steering geometry. Raising the rear of the bike offers up less trail in the forks, and a little better handling in the turns.

I needed a set of new studs for the rear shock to frame mounting points. Two studs were turned out of 1" steel stock, and then a length of 1/2" square steel rod was tacked between the two studs to keep them in alignment.


I torch bent a tube forming the loop and cut two shorties making up the sub-frame. I fish mouthed the tubes and started to mock-up the layout.        


All the parts fitted and in place, Time to tack and lay beads.


The finished frame modification. Yet to come are any mounting points , like battery box, tail piece mounts and turn signal mounts. These will come later as I start do the mock build and get all the components back on.

Wednesday, October 19, 2011

HONDA CM400 CAFE BUILD or Crap To Cool Crap

"Hey bro...your piece of crap is almost as cool as mine...!"
Three valve head and a honda smooth 5 speed gearbox
Who are we kidding here...these things are CRAP. Take the bike apart, and one quickly understands the term "de-contenting". The CM line was clearly an economy ride for the faint of heart. They are plentiful and cheap. So... $100 later...I got one. Then I got two more! these are as common as house flies. The strange thing is, there's a weird sort of following for these cucarachas. Please if you own one of these, and are fond of it, dont take it personally. Ill try to make some positive comments now that may make you feel a tad bit better about your ride. First off, even Hondas crap is pretty good. The Honda company is a class act and their engineering is often astounding. Second, hmm ...ok,  I'm stumped. Well any way, I was gonna shine my turd and get the few parts it needed to make it ride-able and then flip it. When I started looking at the list of parts, the restoration was beyond any sale price. Off it went to the butcher shop! This build is a combination of no holds barred and no money spent. Basically, try to do it all with rattle can and torch. so far the only money spent was on a set of those funky bullet turn signals. This will be a good build to watch in the blog because I will cover a bunch of good stuff like cable shortening and how to fuck up a perfectly good tank. Stay tuned followers, guests, and fellow cyclehackers. Oh by the way, a big HELLO  the folks in Indonesia that are looking at my blog...wtf.

Tuesday, October 18, 2011

CAFE VIRAGO BUILD - Aluminum Tailpiece

With a little break and shear work at my friends shop over at Marquis Restorations, I got the seat pan made up and tig welded it to the bumstop.  Filing and sanding and a few mounts are next. The tail piece is fifty percent of what makes a cafe bike look cool. This build deserves a slab of neoprene race foam on the pan, and that's on order. Now that the pan is set up, I can configure the rear sets.

Thursday, September 15, 2011

A MESSAGE TO MY TWO FOLLOWERS AND...THE REST OF THE WORLD

   Dear Followers, Thank you for your generous loyalty, and your support which I consider charity, because I know how busy you are (all two of you). Thank you also to those who visit this blog, (the rest of you). I implore you to SPREAD THIS LINK like a venereal disease. Don't be shy, be shameless. Please, become a follower and tell your friends. It will make you popular and cool as well! Besides, who doesn't love to look at other people do all the work to make cool bikes, while you sit on your ass and click your mouse! I also must insist, that should I become delinquent in posting regularly, please make nasty and caustic comments to "inspire me to post more often. After all, it's not like I don't have nine billion other (better) F-n things to do! So, if I become lax, complacent, or even lazy, give me ur best Dutch, your best ball busting harassment to get me to post. Name calling will hurt, but I will understand that you're simply starved, and it is I, that am depriving you, of the next posting. Like a babe whose tit has run dry, please, cry out to me!  ok...
   Now  I would like to give you a preview of what's to come in future posts, just to wet your appetites (and entice you to become followers and spread this blog like a...well)    Coming up is;

•1967 Moto Guzzi Ambassador rat rod/bar hopper
•1981 Honda CM400 cafe ... ewwwww
•1977 BMW R75/7 cafe race bike
•1978 Kawasaki KZ400 street/tracker
•1956 BMW Rennsport replica racer
•1976 Aermacchi 350 factory race replica

 So stay tuned, stay alert, and become a follower. Its easy to do, and you can drink alcoholic beverages while doing so. Thanks again for visiting, and come back soon! Ride hard, ride often, and keep the shiny side up!

VINTAGE RACE BRAKES

 I started to re-manufacture vintage drum brakes, replicating the shop-made vented racing drums of the 1960's and 70's. I primarily have been doing Japanese drums, and of those, mostly Honda. These are great for the class racers and cafe customs. I am building a 1956 BMW Rennsport racer replica and I will be doing a Beemer drum  soon. I can vent most any drum. The process begins with cutting the brake plate bezels out of bronze sheet and indexing them with stainless steel screws. Then the openings are marked out and the plate is put on a rotary table, and the vent openings are milled out.

completed brake plate


 The drum itself is bored to receive bronze bezels with stainless steel mesh inserts. Then the spoke web is drilled and reamed for weight reduction ...and also...just because it looks so freakin' cool.
I am working on an all stainless steel linkage to replace the chrome plated stamped stock linkage. I am also casting the brake arms in aluminum, and I'm working on sets of billet brake arms too. I will be posting again with more pictures of the finished stainless linkage and the billet arms.
      I am selling these brake drums and they are priced a' la carte, choose your bezel material (stainless, bronze, aluminum), screen material (bronze, brass or stainless) brake arms, linkage, or just a base drum and plate. Front or rear drums, I do both.  If you would like information on pricing and options, please contact me at:   philippeck@earthlink.net     and just type     Q 4 RACEBRAKE       in the subject box.

CAFE VIRAGO BUILD - Some Aluminum Bits


The stock clutch actuator cover  is a hideous chrome job that had to go, after all, the engine is the focal point on this machine. the goal is all aluminum with black paint, so all the chromie bits MUST go. I machined an aluminum cover out of 1/2" plate with the appropriate reliefs on the reverse side and left an end mill finish on the top. The picture below shows the part installed on the engine.


 The stock Virago air box and filter are gone of course, so an air horn was the obvious way to go. The intake port enters the monocoque backbone on the left hand side, and cleverly uses ports in the frame to deliver air to each carburetor. I machined a very large velocity stack in aluminum that bolts onto the frame and will fit a filter element inside the frame port. Check out the scale with the penny next to it.  Frankly, it looks bad ass. I like it.


The stack, in place.

CAFE VIRAGO BUILD - Subframe And Tailpiece

 I torch bent some tubing and made the hoop frame, then cut some shorties and milled fish mouths in the ends to fit the mounting collars and tubing. The mounts were machined from 1" stock. I machined a set of 1" rounds and tig welded them to the frame just behind the tank. The rear mounts of the subframe use the stock mounting points on the frame.
                             With the subframe in place the bike is taking shape.  Now its starting to look cool, not a girl bike anymore.      

 Whack out an arc from some aluminum sheet and get it on the english wheel. This part took about 45 minutes to make, with one annealing.
I really hate to call it a Virago anymore, its turning into something I would ride. The lines are a bit modern as the horizon line of the tank to tailpiece is jacked up, but has a nice retro look at the same time with the little round bumstop. I'm thinking about a nice frame mount bikini fairing in aluminum to balance the aluminum tailpiece, I'm not sure of what's up yet in terms of the finish on the aluminum parts and I'll see when the tailpiece and fairing are done.